Cloudflare is a global network designed to make everything you connect to the Internet secure, private, fast, and reliable. The reason I love cloudflare is that it offers the greate service and totally free! I always use cloudflare SSL to host my frontend webs and buy wildcard SSL for backend services. So I think it is super usefull to protect my apis in K8s by Cloudflare SSL. In this article, I configure cloudflare SSL in my backend service which is host in AWS kubernetes.
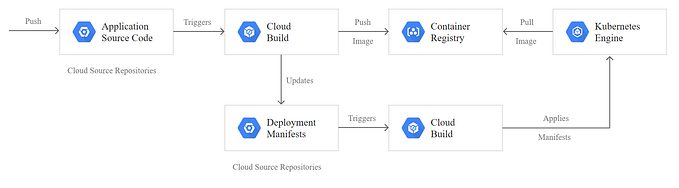
Here is how SSL works with for your backend with Cloudflare.

There are 4 steps to configure SSL in K8S as below:
1. Create an Origin CA certificate
To create an Origin CA certificate in the dashboard:
- Log in to the Cloudflare dashboard and select an account.
- Choose a domain.
- Go to SSL/TLS > Origin Server.
- Click Create Certificate.
- List the hostnames (including wildcards) the certificate should protect with SSL encryption. The zone root and first level wildcard hostname are included by default.
- Choose the expiration date.
- Click Next.
- Choose the Key Format:
- Click OK.
2. Create TLS secret
Withi the PEM certificate from previous step, convert certificate and private key value to base-64 string then create a secret in your kubernertes
3. Installing Origin CA Issuer
Download source code from Cloudflare CA
Installing Origin CA Issuer
$ kubectl apply \
    -f deploy/crds \
    -f deploy/rbac \
    -f deploy/manifests
The Origin CA Issuer will be deployed in the origin-ca-issuer namespace.
$ kubectl get -n origin-ca-issuer pod
NAME                                READY   STATUS      RESTARTS    AGE
pod/origin-ca-issuer-1234568-abcdw  1/1     Running     0           1m
We need to fetch our API service key for Origin CA. This key can be found by navigating to the API Tokens section of the Cloudflare Dashboard and viewing the “Origin CA Key” API key. This key will begin with “v1.0-” and is different than your normal API key. It is not currently possible to use an API Token with the Origin CA API at this time.
Once you’ve copied your Origin CA Key, you can use this to create the Secret used by the OriginIssuer.
kubectl create secret generic \
    --dry-run \
    -n default your-service-key \
    --from-literal key=v1.0-FFFFFFF-FFFFFFFF -oyaml
Then create an OriginIssuer referencing the secret created above.
cat <<EOF | kubectl apply -f  -
apiVersion: cert-manager.k8s.cloudflare.com/v1
kind: OriginIssuer
metadata:
  name: prod-issuer
  namespace: default
spec:
  requestType: OriginECC
  auth:
    serviceKeyRef:
      name: your-service-key
      key: key
EOF
4. Add Ingress Certificate to your service
cat <<EOF | kubectl apply -f -

# example-ingress.yaml
apiVersion: networking/v1
kind: Ingress
metadata:
  annotations:
    kubernetes.io/ingress.class: nginx
    # ssl certificate
    cert-manager.io/issuer: prod-issuer (step 3)
    cert-manager.io/issuer-kind: OriginIssuer
    cert-manager.io/issuer-group: cert-manager.k8s.cloudflare.com
    # dns record
    external-dns.alpha.kubernetes.io/hostname: example.com
    external-dns.alpha.kubernetes.io/cloudflare-proxied: "true"
  name: example-ingress
  namespace: default
spec:
  rules:
    - host: example.com
      http:
        paths:
         - pathType: Prefix
           path: /
           backend:
              service:
                name: example-svc
                port:
                  number: 80
  tls:
    # specifying a host in the TLS section will tell cert-manager what
    # DNS SANs should be on the created certificate.
    - hosts:
        - example.com
      # cert-manager will create this secret
      secretName: [your-sslcerts from step 2]

EOF
Done, now your Ingress is procted by Cloudflare SSL and you don’t need to buy Wildcard SSL anymore!