Complete guides to deploy .NET core Microservice apps to Azure AKS by Pulumi - part 1: Azure Sql, Container Registry, and DevOps Pipeline
TLDR: In this guide I will deploy .NET core micrservice apps to Azure AKS, Azure SQL server by Pulumi Infrastructure as Code, the code is written in Typescript
- Source-code published here
- Microservice architect overview is in below document:

I forked from Abp framework to my github repository for deployment:
You must install Pulumi in your local computer, please see guide from here
Create new folder and run this command:
pulumi new azure-typescript
Deploy 2 Azure Sql Databases: product-db and identity-db
- Create sql-deployments.ts file as below
- Run pulumi up to deploy Sql databases

Select “yes” and wait for deployment, after successful deployment you can see result as below

Deploy Azure Container Registry
Create container-registry.ts file as below
- Run pulumi up to and select “Yes” to deploy
- After successful deployment, you can navigate to Azure portal to see your container service as below

Deploy IdentityServer4 to Azure Container Registry by DevOps
- Go to dev.azure.com and login/sign up with your account
- Create new DevOps project (e.g microservice-demo), select private or public project. I create public project at https://dev.azure.com/hadoan-demo/microservice-demo
- Go to Pipelines\Create Pipeline, then choose “Use the classic editor”

- Authorize your Github account to allow Azure DevOps pull source-code

- Select project you want to deploy

- Choose “Docker container” template

- Go to Trigger section, enable “Enable continuous integration” for CI, you can enable Folder trigger in Path filter section below if you want trigger your CI only from specific folder (this project I don’t use it!)

- I am going to deploy AuthServer.Host project in below folder
- Docker file is in https://github.com/hadoan/abp/tree/dev/dockers folder
- Go to Tasks section, remove everything below “Agent job 1” and then select “Add a task to Agent 1”

- Filter “copy file” and Add to Task


- Add “Install Docker” task

- Add “Command line” task to build docker file

As you see in above picture we will build “auth-server-host” image and later push to Container Registry
- Add “Run Docker command” task to push to Container Registry

Input Parameters as above picture, select “DemoMicroserviceRegistry” as we created before by Pulumi.
- Save and run CI


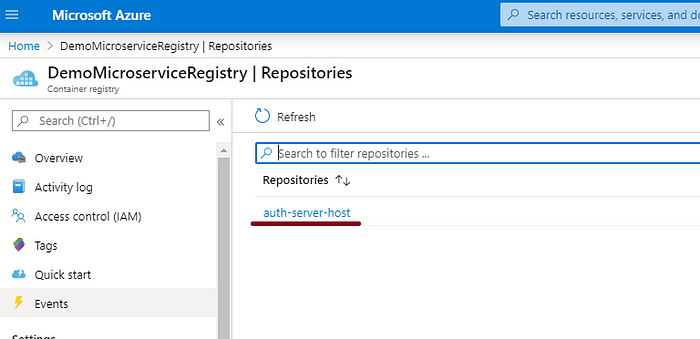
- Wait few minutes for CI to build and push image to Container Registry

- After sucessfully build, we create new image to the Registry as below
That is enough for PATR 1, in Part2 I’ll show how to create Azure AKS and deploy containers from Container Registry and Kubernetes Workload!